The Silhouette Portrait 4 is a compact, portable cutting machine. It is perfect for small to medium-sized crafting projects. Whether you’re cutting vinyl, paper, stickers, or fabric, the Silhouette Portrait 4 provides precision and flexibility for all your creative DIY projects.
If you have bought a new Silhouette Portrait 4 and are looking to set it up, then you have come to the right place. In this step-by-step guide, we will show you how to setup Silhouette Portrait 4.
So, without wasting your valuable time, let’s proceed to the setup process.
Steps to Setup Silhouette Portrait 4
Please follow the steps below to setup Silhouette Portrait 4:
Step 1: Unbox and Prepare Your Machine
Firstly, carefully unbox your Portrait 4 and make sure you have all the necessary parts.
1.1 Check included items
The Silhouette Portrait 4 comes with the items given below. Make sure that all the items have been included before starting.
- Silhouette Portrait® 4
- Power Cord
- Mat
- AutoBlade
- Blade Adjustment Tool
- Power Terminal
Make sure all these accessories are included when unpacking your Silhouette Portrait 4 machine.
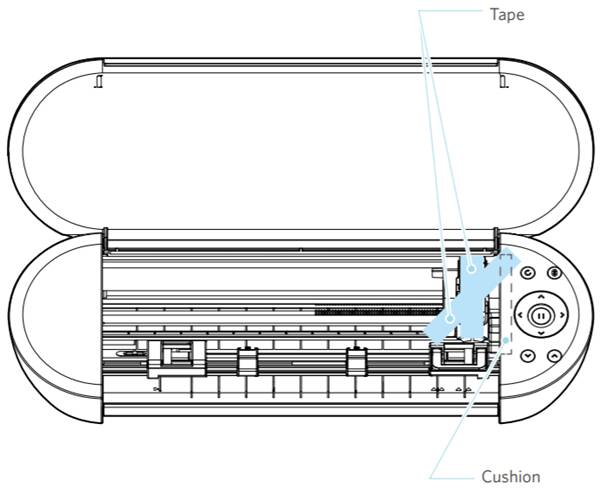
1.2 Removing Packaging Materials from the machine
Remove all the packaging materials. There are strips of tape and cushions to hold the parts of Silhouette Portrait 4 in place during shipment to avoid any damage to the machine.
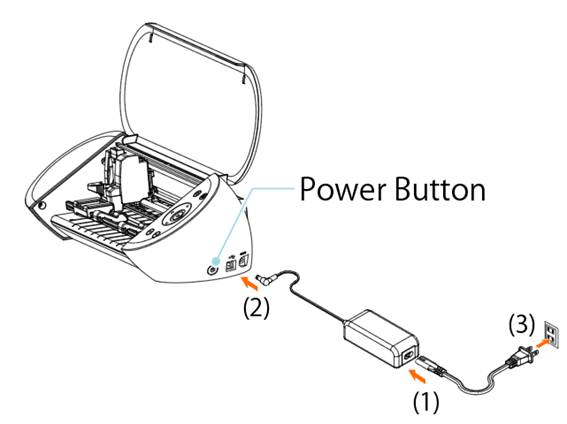
1.3 Connect The Power Cables And Turn On
Plug the power cable into the machine and connect it to a power outlet. After that, press and hold the Power Button for at least two seconds to start Silhouette Portrait 4.
Step 2: Download & Install Silhouette Studio Software
Go to the official Silhouette America website and download the Silhouette Studio software. Follow the installation prompts for your operating system (Windows or Mac).
For Windows
- Visit the official Silhouette America website.
- Click on the Software page on the navigation bar.
- Then, select the Silhouette Studio® from the dropdown options.
- After that, click on Windows 64-bit.
- Next, verify that you are not a robot, and then click on the Download button.
- Once the file is downloaded, double-click on it to start the installation process.
- Then, follow the prompts on the setup screen to install it.
- Click “Next (N)” when prompted on the setup wizard.
For Mac
- Go to the official Silhouette America website.
- Click on the Software page on the navigation bar.
- After that, select the Silhouette Studio® from the dropdown options.
- Next, click on Mac 64-bit.
- Then, verify that you are not a robot, and then click on the Download button.
- Once the download is finished, double-click the downloaded installer file to execute it.
- Now, drag the Silhouette Studio icon into the Applications folder and install it.
Note: If you have already installed the Silhouette Studio software, it is recommended that you update it to the latest version.
Step 3: Connect the Silhouette Portrait 4 to Your Computer
You can connect your new Silhouette Portrait 4 to your computer using a USB cable or wireless connection with Bluetooth. Here are the steps to connect your Silhouette Portrait 4 to your computer.
Connect with Bluetooth
The Silhouette Portrait 4 comes with a built-in Bluetooth adapter that allows a wireless connection with your computer.
- Firstly, connect your Silhouette Portrait 4 to a power source.
- After that, press and hold the Power button for at least two seconds to start Silhouette Portrait 4.
- Then, press the Bluetooth button. Now, the lamp lights up in blue, indicating it is ready for use.
- Next, turn on the Bluetooth on your computer.
- Open the SEND panel of Silhouette Studio and click the Silhouette Devices icon.
- Now, select your Silhouette Portrait 4 from the list of available devices. The software will start syncing.
- When your Silhouette Portrait 4 status displays as Ready, the setup is complete.
Connect with a USB Cable
- Use a USB cable to connect your Silhouette Portrait 4 machine to your computer.
- Then, press the Power button to start your Silhouette Portrait 4.
- Then, go to the SEND panel of Silhouette Studio and click the Silhouette Devices icon.
- Now, a list of available devices will appear. Select your Silhouette Portrait 4 from the list.
- The software should detect the machine once connected.
Step 4: Load a media
Before you begin, make sure your Silhouette Portrait 4 is turned on.
- Position the left edge of the media with the Guiding Line on the front panel.
- Adjust the Pinch Roller Unit to match the media width.
- Then, load the media.
- After that, position the media’s tip against the Pinch Rollers on both sides and load it straight. Pull the media tight with both hands when loading.
- Now, press the Media Load button to begin feeding the paper.
Step 5: Set the Auto Blade
- Pull the lock lever of the Tool Holder gently towards you to unlock it.
- Then, align the rib of the Auto Blade with the notch of the Tool Holder and insert it securely.
- Next, lock the lock lever back.
- When setting the Auto Blade, Silhouette Portrait 4 recognizes it and automatically displays it in the SEND tab of Silhouette Studio.
Step 6: Create Cutting Data
Use the Silhouette Studio’s drawing tools to create cutting data. The drawing tools include lines, ellipses, rectangles, polygons, curves, and texts. They are displayed in the toolbar on the left side of the screen.
Step 7: Cut The Created Data
Cut the created data using your Silhouette Portrait 4 machine.
- Load the media onto your Silhouette Portrait 4 machine.
- Then, click the SEND tab on the top right of the Silhouette Studio screen.
- Now, the Cut Setting Panel will display. Select the material, action, and tool according to the media to use.
- Lastly, press the SEND button to start cutting the media.
- After the cutting job is done, press the Unload button to remove your material from the machine.
Once you’ve completed these steps, you should be ready to start creating your creative projects with your Silhouette Portrait 4.
Conclusion
We hope you find this guide helpful. The Silhouette Portrait 4 is the ultimate compact, portable machine perfect for cutting labels and creating personalized stickers and decals. It supports a wide range of materials and sizes.
Setting up your Silhouette Portrait 4 is a simple process that takes a few moments. By following the steps above, you can easily setup Silhouette Portrait 4.
Thank you for reading this post! Please stay connected with us for more tips and guides to make the most of your Silhouette Portrait 4.